Add an AI support bot to your website
This guide walks you through adding an AI support bot to your website step by step. It answers questions grounded in your real product docs, and hands off to a human when it cannot resolve something. No code required — you can be live in about ten minutes.
What you will build
By the end of this guide you will have a customer-service AI employee answering questions on your website from your real product information, with a clean fallback to a human whenever it is unsure. You will create the employee, give it knowledge, turn on the website support channel, configure how handoff works, embed it on your site, and test the whole flow.
Steps
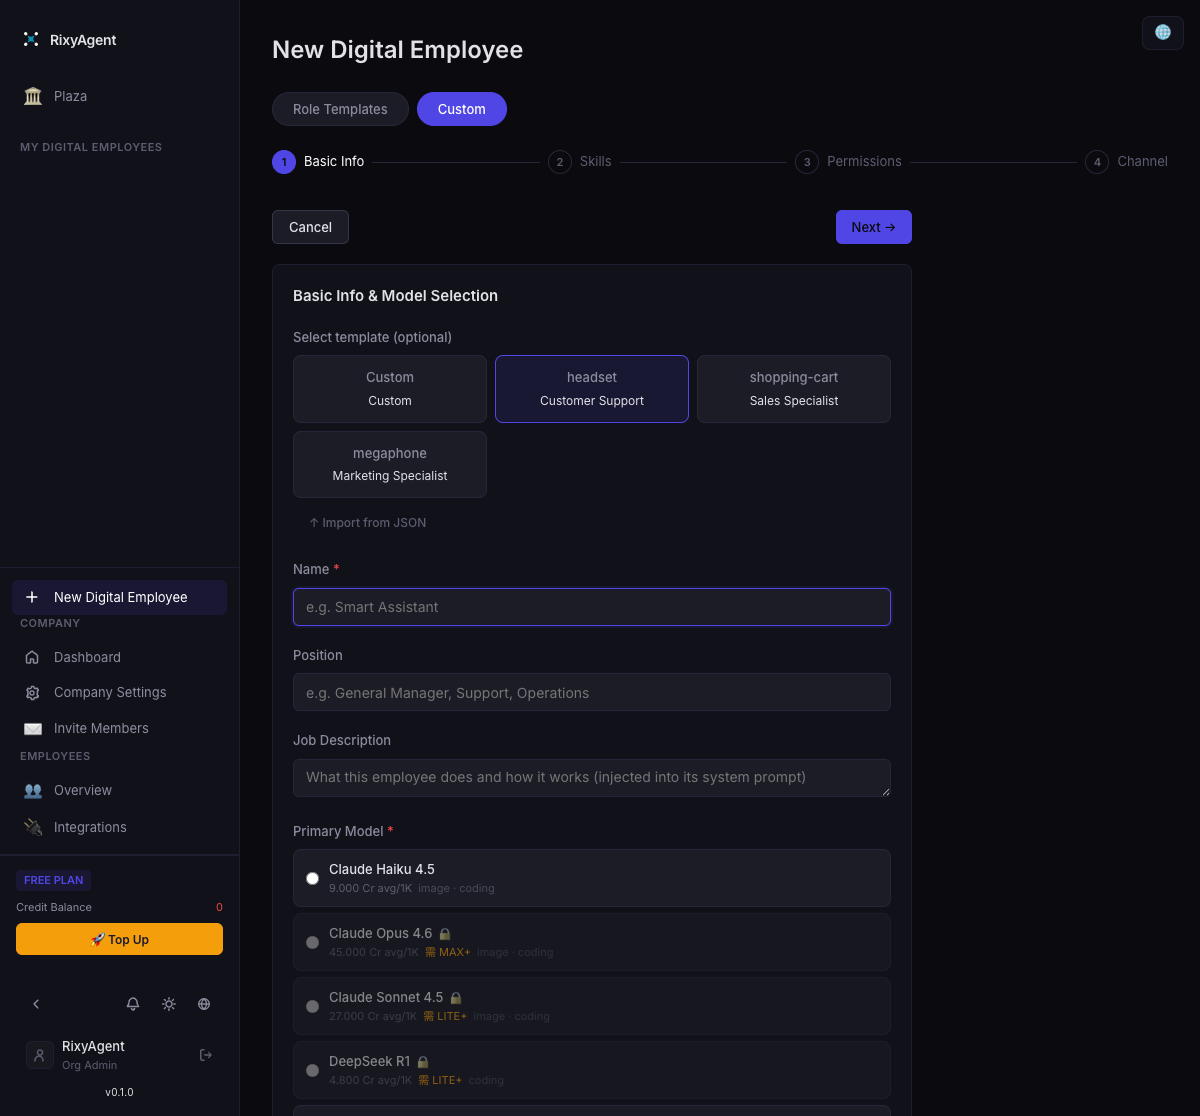
01Create a customer-service employee
In RixyAgent, create a new digital employee and choose the Customer Service type. Customer-service employees are built differently from your internal employees: they run on ephemeral, high-concurrency sessions designed to handle many end-customers at once, and they are marked with a 🎧 badge so you can spot them at a glance.
You can set the type two ways:
- In the role wizard, pick the Customer Service role, or
- In custom mode, set the function type to Customer Service.
02Give it knowledge
A support bot is only as good as what it knows. Add your product docs, pricing, and FAQ to the company knowledge base so the employee answers grounded in real information instead of guessing. Keep the content current — when your docs change, update the knowledge base and the bot stays accurate.
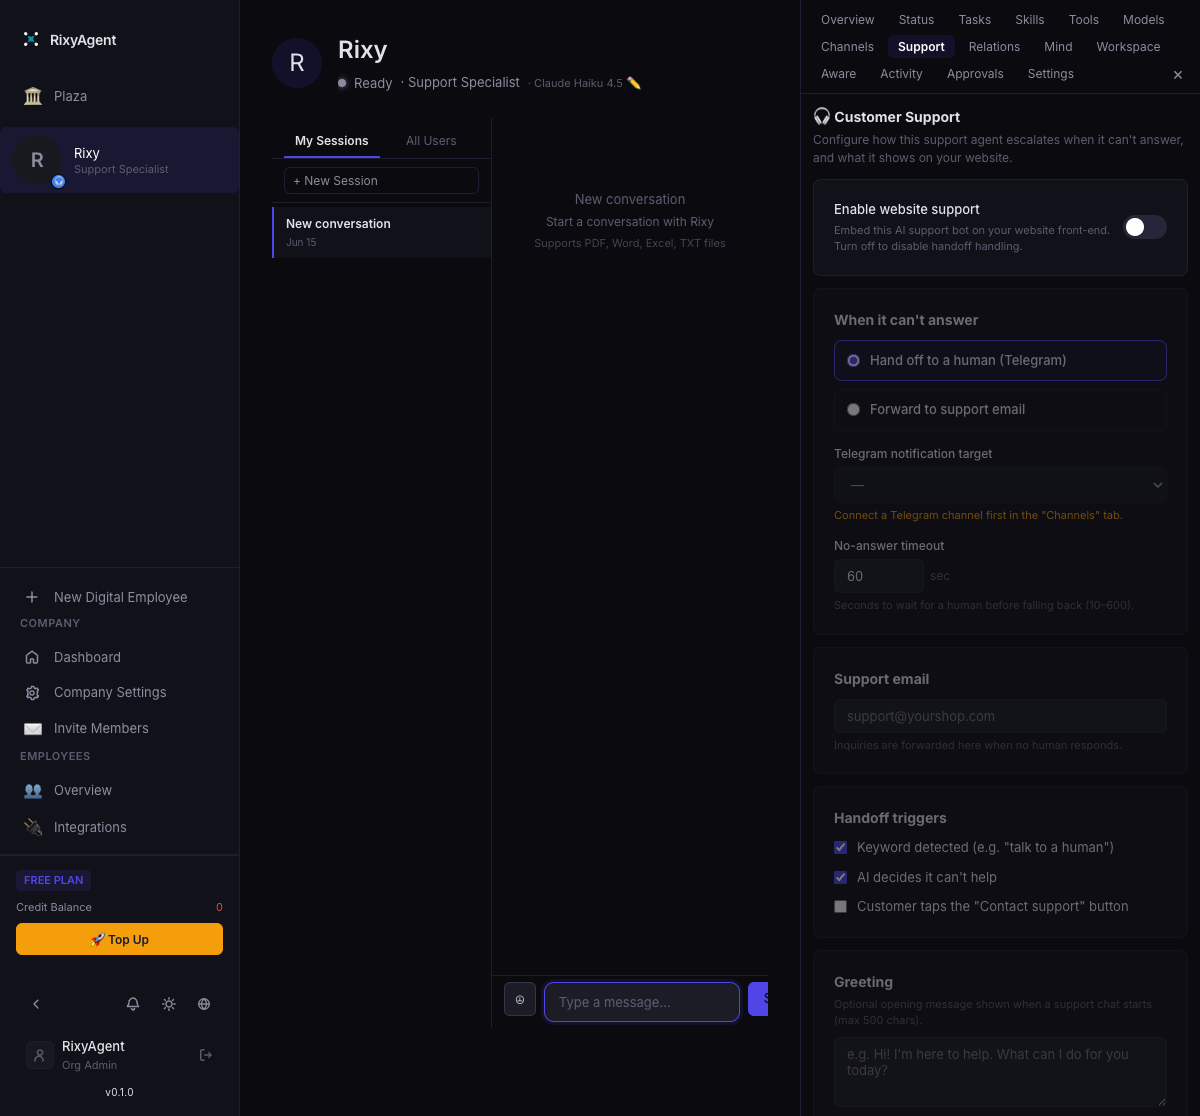
03Open the employee's "Support" tab
Open the customer-service employee and go to its Support tab. This tab only appears on customer-service employees — it is where you turn the website widget on and decide what happens when the bot reaches its limits.
04Enable website support and configure handoff
Toggle on Website support, then configure how the employee should behave when it cannot answer:
What happens when it can't answer?
- Escalate to a human (via Telegram) — the default. The conversation is routed to a human teammate in real time.
- Forward to support email — the question is sent to your support inbox and a human replies later.
If you choose escalate-to-human, set the following:
- Telegram target — pick the group or bot you have already connected under the Telegram channel. That is where live handoffs land.
- No-answer timeout — default 60 seconds. If no human picks up within this window, the conversation auto-falls-back to email so the customer is never left waiting.
- Support email — the fallback recipient for forwarded and timed-out conversations.
Triggers
Decide when the bot should hand off in the first place:
- When the user asks for a human— matched on keywords (for example, "talk to a person", "agent", "human").
- When the AI judges it can't resolve — the employee decides it is out of its depth and escalates on its own.
Greeting message (optional)
Add a short greeting that the widget shows when a visitor opens the chat — a friendly opener like "Hi! Ask me anything about pricing, setup, or your account."
05Embed the widget on your site
Paste this snippet into your site's HTML, just before the closing </body> tag. A chat bubble appears in the bottom-right corner.
<script src="https://rixyagent.com/widget.js"
        data-endpoint="https://app.rixyagent.com/api/public/support-chat"
        async></script>
Optional attributes: data-name (brand shown in the header), data-lang ("en" or "zh"), data-accent (a hex color), and data-email (the fallback contact address). Lead emails captured in the chat show up in your Support Leads inbox.
06Test it
Before pointing customers at it, run through the flow yourself:
- Open your site and start a chat. Ask a question your docs cover and confirm the answer is grounded and correct.
- Test the human handoff: ask to speak to a person (or ask something deliberately out of scope) and confirm it escalates to your Telegram target.
- Let the no-answer timeout elapse without responding and confirm the conversation falls back to your support email.
How it works
- Per-visitor sessions. Each website visitor gets their own isolated, short-lived session. Conversations do not bleed into one another, and the high-concurrency design means many customers can chat at the same time.
- Lead capture.The widget can collect a visitor's name and email so you keep a record of who you talked to and can follow up — useful when a conversation turns into a sales or support ticket.
- Costs run on your own Credits. The bot uses the same Credit balance as the rest of your workspace, billed by actual model and tool usage. You can review per-employee consumption on the Billing page.
- Rate limits. Sensible limits protect you from runaway usage and abuse, so a sudden spike in traffic stays controlled and predictable.
Next steps
That is the whole flow: create a customer-service employee, feed it your knowledge, turn on website support, configure handoff, embed the widget, and test. If you get stuck, head back to the Help Center or email us.